CPP 64-67 Nova Stock Spindle Front Disc Brake Conversion kit install
This page describes the installation of Classic Performance Products' 64-67 stock spindle front disc brake conversion kit, and the MCPV-1 master cylinder.
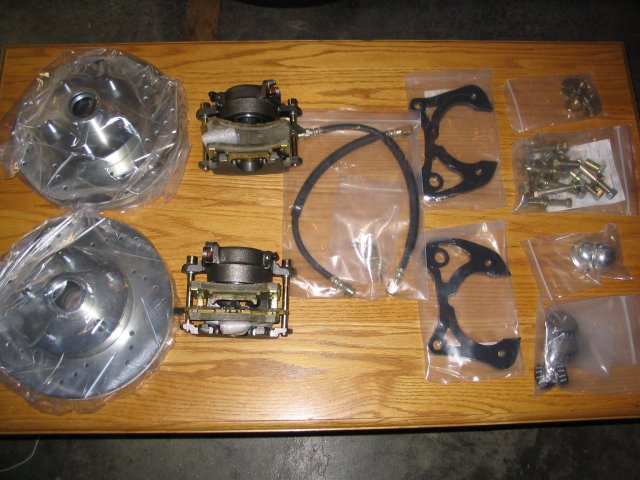
The brake kit is 6467WBK-S "Stock spindle wheel brake kit 1964-67 Nova", $399, and the MC is CP31500-P, "MCPV-1 Master 2/build in prop valve 1" bore polished finish", $189. (prices are as of fall 2006)
Aside from the obvious improvement of a disc setup over the stock drum brakes, this kit has two major benefits. First the kit is designed to work with the stock 5-lug (64-67) front spindles. No need to modify the bracket mounting boss as with the 68-74 retrofit approach. Second, this kit is designed to keep the track width the same as it was originally. Again, the 68-74 retrofit approach falls short, as that will push the front wheels out about 1/2" per side. That can cause your tires to rub if you are tight for space.
You can purchase the parts described in this writeup directly from Classic Performance Products, or from many vendors that carry their parts, including National Nostalgic Nova.
[WARNING/DISCLAIMER: use this information at your own risk, modifying automobile brake systems can lead to dangerous situations, always have a trained mechanic check your work, I take no responsibility for the results, you've been warned, you're on your own...]
I've written this up two ways: a quick install guide, and the complete step-by-step guide. The quick install guide just hits the high points of the install, and the step-by-step guide is every step in pretty close detail.
General tips:
- You will need a way to support the car so that you can take the front wheels off. Make sure that whatever method you use is safe and stable before you start work.
- Make sure you have enough brake fluid to bleed the brakes after everything is installed. I used 5 pints of fluid. Since DOT3 brake fluid will absorb moisture (and corrode your brake system from the inside), it's important to keep the containers sealed. I bought the pint size containers instead of a larger one to make sure the fluid stayed fresh. DOT3 brake fluid will take off paint. If you spill some on a painted surface, wipe it off immediately.
- You will also some wheel bearing grease to lubricate the new wheel bearings.
- Getting all of the air out of the master cylinder, lines, and slave cylinders or calipers is crucial to proper operation of the brakes. I tried several methods of bleeding the air out of the system, and had the best luck with SpeedBleeder bleed valves. These valves are available from CPP, or direct from SpeedBleeder. The front calipers in this kit use part number SB1015, and the stock rear drums use part number SB51624.
- You will also need two short lengths of brake line with 3/8" flare fittings, and some rubber hose that will fit over the lines to bleed the master cylinder. A large (50CC) sryinge or mityvac is also helpful.
- 62-66 Novas came from the factory with a single chamber master cylinder. That means that the hydraulic pressure for all wheels comes from a single source. If there is a leak in the system, you will lose pressure to all four brakes. In 67, GM used a dual chamber master cylinder. The front and rear brakes each had their own source. If there is a leak, you only lose one set of brakes, a great safety improvement. The plumbing on the 62-66 models connects the rear brake line to the junction block on the right front fenderwell. If you have a that setup and want to install this kit, you will need to replace that line. Remove the original line between the junction block and the rear flex hose. Replace it with a 67 brake line (or fabricate your own) that goes from the rear flex hose to the master cylinder. You will also need to plug the unused connection in the junction block on the right front fenderwell. My car was already replumbed for a dual chamber master cylinder, so that part of the conversion is not covered in the writeup below.
- Make sure you mark everything as right and left side as you take it out of the box. Not all of the parts are labelled by side on the part.
- The banjo fitting bolt on the caliper is 10mm metric. You will also need 1/8", 1/4", and 3/8" allen wrenches. A torque wrench is very helpful, but not entirely necessary.
- You will need a tubing cutter, and a tube flaring tool to modify the brake lines to the correct length to work with the MCPV-1
- Tubing wrenches are very helpful, although not necessary. These look like box wrenches with a slot cut in them. That allows the wrench to slip over the brake line and grab more corners on the nut than a standard box wrench. That helps avoid rounding off the corners on the nuts.
|
||||
|
The wrapup: |
patman@bracketracer.com
Unless otherwise specified, all text and images on this page are © Copyright 2006 by Pat Mancuso.